Last Updated on April 8, 2025 by Adil
If you’re looking to enhance your Canva designs by adding personal images, you’re in the right place! This guide will teach you how to upload a photo on Canva so you can use your own photos in presentations, social media posts, posters, and more. Whether you’re using Canva Free or Canva Pro, the process is simple and quick.
Why Upload a Photo to Canva?
Uploading your own photos gives you the freedom to:
- Personalize designs
- Maintain brand consistency
- Add a professional touch
- Use real-life visuals instead of stock photos
Requirements Before You Upload
Before you begin, make sure:
- You’re logged into your Canva account
- You have a photo saved on your device (computer, phone, or tablet)
- Your file is in a supported format: JPG, PNG, SVG, GIF, or WebP
- Your image is under 25MB (for Canva Free users)
How to Upload a Photo on Canva (Desktop Version)
Follow these steps if you’re using Canva on a computer:
1. Log in to Canva
Go to www.canva.com and sign in to your account.
2. Open a Design or Start a New One
- Click on “Create a design” from the homepage
- Choose a template or custom size
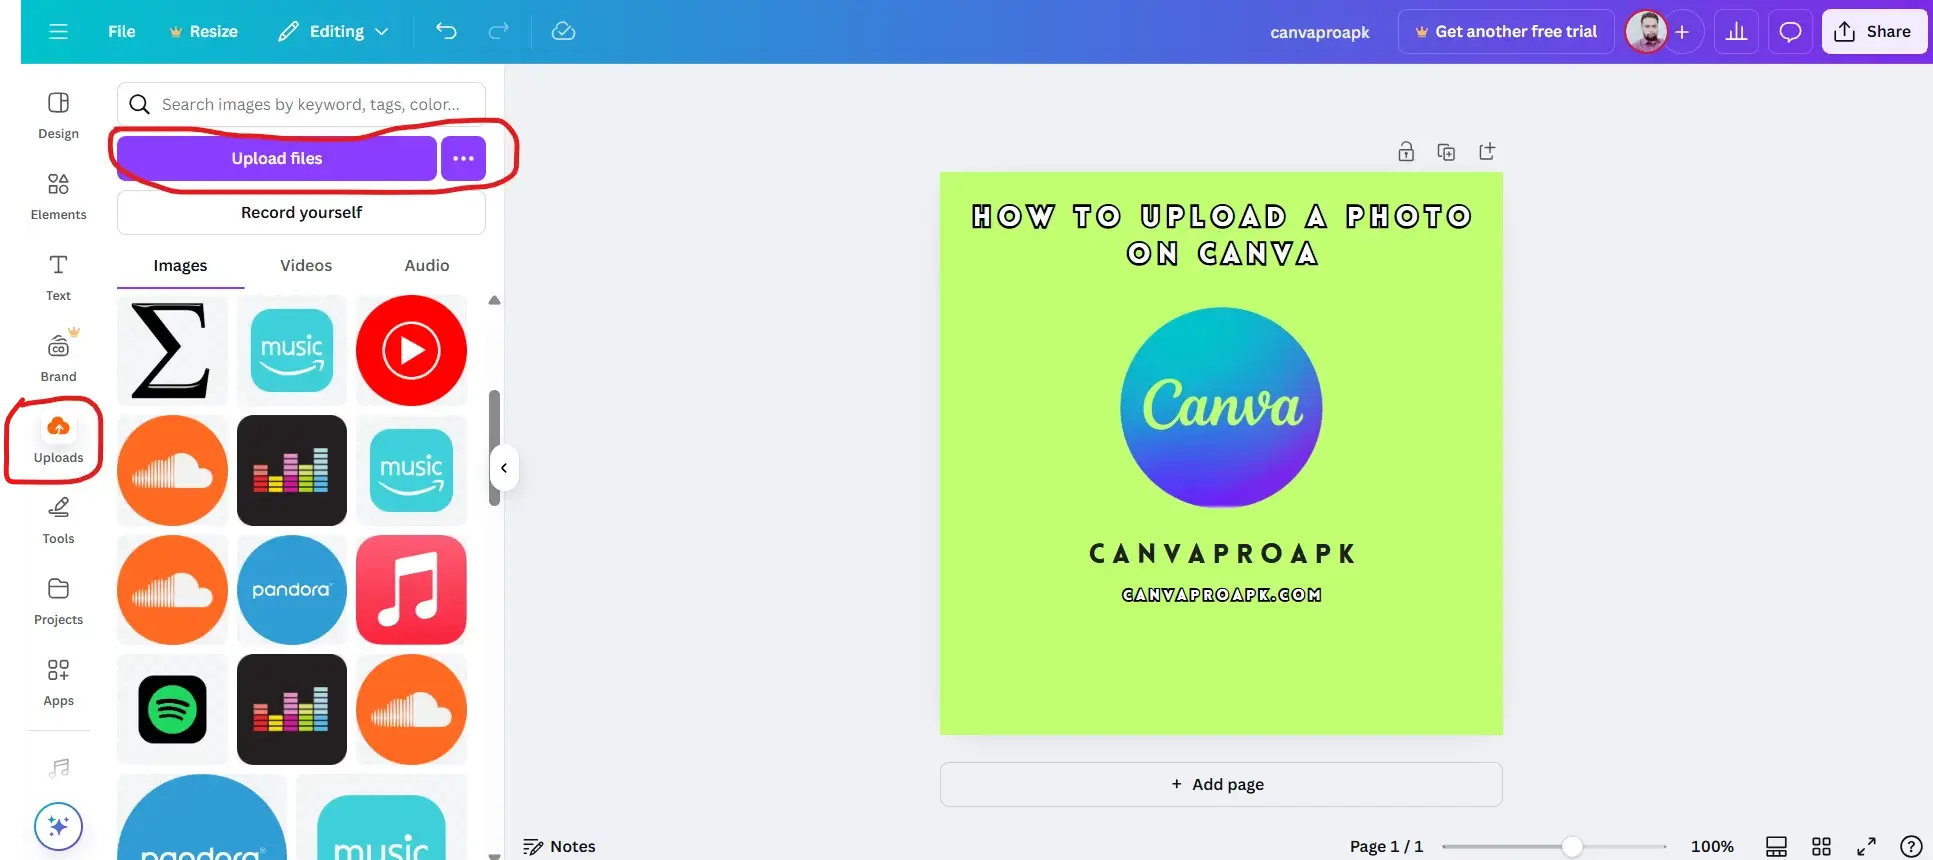
3. Go to the Uploads Tab
On the left-hand sidebar, click on “Uploads” (represented by an upward arrow icon).
4. Click the Upload Files Button
- Click the purple “Upload files” button
- A file browser will pop up
- Select the photo(s) you want to upload from your device
5. Wait for the Upload to Complete
Once uploaded, your photo will appear in the Uploads section
6. Drag and Drop Your Photo onto the Canvas
Simply drag the photo onto your design and resize or move it as needed.
How to Upload a Photo on Canva (Mobile App)
Using the Canva mobile app (Android or iOS)? Here’s how:
1. Open the Canva App
Download the app from the Play Store or App Store if you haven’t already.
2. Log in and Create a Design
Tap the “+” icon at the bottom and choose a design type.
3. Tap the “+” Icon Again on the Editor Screen
- Choose “Uploads”
- Tap “Upload media”
4. Select Your Photo Source
Choose from:
- Your phone gallery
- Google Drive
- Dropbox (if connected)
5. Select the Photo and Upload
Tap the image you want to upload. It will start uploading instantly and appear in the Uploads section.
6. Insert the Photo Into Your Design
Just tap on the uploaded image, and it will appear in your design.
Pro Tips for Using Uploaded Photos
- Rename your images with relevant keywords before uploading for better SEO (especially for websites and blogs).
- Organize photos in folders using Canva Pro for easier access.
- Apply filters, effects, or remove background (Canva Pro feature) to make photos blend seamlessly.
- Upload transparent PNGs for logos or icons.
Troubleshooting
- Photo not uploading? Check your internet connection or file size.
- Unsupported format? Convert your image to JPG or PNG before uploading.
- Image not showing? Try refreshing Canva or re-logging in.
Use Uploaded Photos in Templates
Once uploaded, you can:
- Replace existing template images with your own
- Add them to Grids or Frames for unique layouts
- Animate them using Canva’s animation tools
Conclusion
Learning how to upload a photo on Canva is one of the easiest and most useful skills to master on the platform. It opens up a world of customization, especially when designing for social media, branding, or personal projects.