Last Updated on December 19, 2024 by Adil
Key Takeaways
- Canva provides multiple ways to add borders, such as elements, shapes, image effects, and frames.
- Borders enhance design focus, balance, and overall aesthetics.
- Customization options include changing color, thickness, and transparency.
- Experimenting with styles helps you discover the best look for your design.
- Consistency in border use ensures a professional and cohesive design.
Introduction:
Adding borders in Canva enhances your designs by emphasizing content and creating visual balance. This comprehensive guide will walk you through various methods on How to add border in Canva projects, ensuring your designs stand out.
Adding borders to your designs in Canva is a simple yet effective way to enhance visual appeal and focus. Below is a detailed table summarizing the different methods you can use to add borders in Canva. Follow these steps to make your designs stand out!
| Method | Steps | Customization Options |
| Using Canva Elements | 1. Open Canva and load your design. 2. Click on the “Elements” tab. 3. Search for “borders.” 4. Add a border and adjust its position. | – Resize to fit your design. – Change color, thickness, or style using the toolbar. |
| Creating a Custom Border | 1. Go to the “Elements” tab. 2. Select a shape (rectangle or square). 3. Adjust its size to fit as a border. 4. Customize as needed. | – Modify transparency. – Adjust thickness and colors. |
| Adding Borders to Images | 1. Click the image in your design. 2. Select “Edit Image.” 3. Apply the “Glow” effect under Shadows. 4. Customize the effect settings. | – Change border color. – Adjust size, transparency, and blur for a sharp or soft border look. |
| Using Frames for Borders | 1. Search for “Frames” in the “Elements” tab. 2. Choose a frame and add it to your design. 3. Insert an image into the frame. | – Adjust frame size and position. – Explore different frame styles to suit your design. |
Method 1: Using Canva Elements
- Open Your Design: Launch Canva and open an existing project or create a new one.
- Access Elements: In the left-hand panel, click on the “Elements” tab.
- Search for Borders: Use the search bar within the Elements tab and type “borders.”
- Select a Border: Browse through the available border options and select one that complements your design.
- Add and Adjust the Border: Click on the chosen border to add it to your design. Resize and position it appropriately around your content.
- Customize the Border: Utilize the toolbar above the editor to change the border’s color, thickness, and style to match your design aesthetics.
Method 2: Creating a Custom Border with Shapes
- Open Your Design: Access your project in Canva.
- Access Elements: Click on the “Elements” tab in the left-hand panel.
- Select a Shape: Choose a rectangle or square shape from the “Shapes” section.
- Add the Shape: Click on the shape to insert it into your design.
- Resize the Shape: Adjust the shape’s dimensions to fit the edges of your canvas, creating a border effect.
- Customize the Shape: Use the toolbar to set the shape’s color, adjust its transparency, and modify the border weight to achieve the desired look.
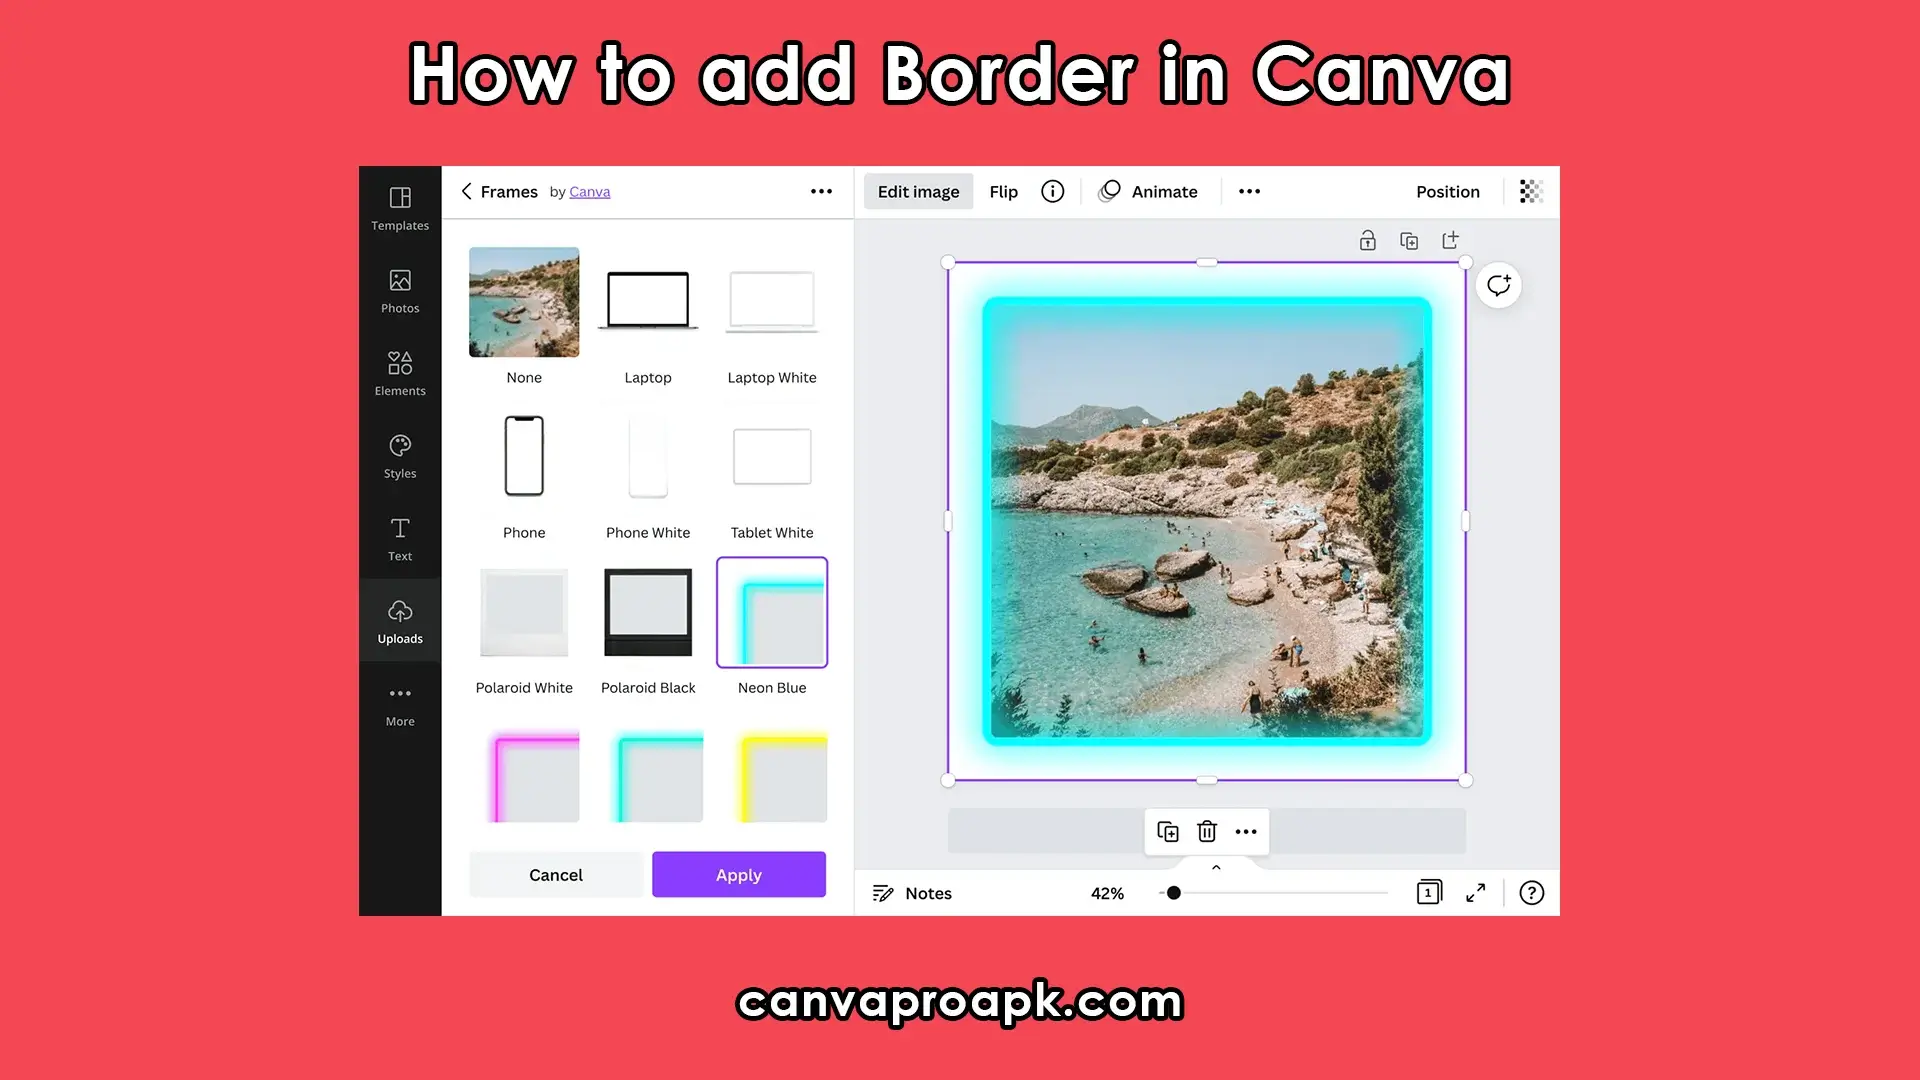
Method 3: Adding Borders to Images
- Select the Image: Click on the image within your design to highlight it.
- Edit the Image: In the toolbar above the editor, click on “Edit Image.”
- Apply a Border Effect: Scroll to the “Shadows” section and select “Glow.”
- Customize the Border:
- Color: Choose your preferred border color.
- Size: Adjust the size slider to set the border’s thickness.
- Transparency: Set transparency to 100 for a solid border.
- Blur: Reduce the blur to 0 for a sharp edge.
- Apply Changes: Click “Apply” to add the border to your image.
Method 4: Using Frames for Borders
- Access Elements: Click on the “Elements” tab.
- Search for Frames: Type “frames” into the search bar.
- Select a Frame: Choose a frame that suits your design needs.
- Add the Frame: Click on the frame to insert it into your design.
- Insert Your Image: Drag and drop your image into the frame; it will automatically adjust to fit.
- Customize the Frame: Modify the frame’s size and position as needed.
Tips for Effective Border Usage
- Consistency: Maintain uniform border styles throughout your design to ensure cohesiveness.
- Color Harmony: Select border colors that complement your overall color scheme.
- Appropriate Thickness: Adjust border thickness to enhance readability without overwhelming the content.
- Experimentation: Don’t hesitate to try different border styles and effects to discover what best enhances your design.
By following these methods, you can effectively incorporate borders into your Canva designs, adding emphasis and aesthetic appeal to your projects.
For a visual demonstration, you might find this tutorial helpful:
You can watch more Canva Tutorials on CanvaProApk