Last Updated on October 28, 2024 by Adil
Brochures are an effective way to share information about your products, services, or events. Whether you’re promoting a new business, launching a product, or spreading awareness about an event, a well-designed brochure can make a big impact. Canva is a user-friendly design tool that allows you to create professional-looking brochures even if you don’t have a background in graphic design. Here’s a detailed guide to help you create a brochure using Canva from scratch.
Key Components of an Effective Brochure
1. Clear and Compelling Headline
The headline is the first thing a reader notices. It should be:
- Attention-grabbing: Use words that spark interest, such as “Discover,” “Exclusive,” or “Limited Time.”
- Clear and concise: The headline should clearly state the main benefit or purpose of the brochure. It should not be longer than 10-12 words.
- Relevant to the audience: Use language that resonates with the target market.
An effective headline immediately tells the reader what to expect and encourages them to read further.
2. Strong Visual Appeal
The overall design and layout of the brochure must be visually appealing:
- Use high-quality images: Images should be sharp, relevant, and able to convey the message. They should support the written content rather than distract from it.
- Incorporate a color scheme: Choose colors that align with your brand while also making the brochure inviting. Limit the color palette to 2-3 complementary colors to maintain consistency.
- Add illustrations, icons, and graphics: These elements help break up the text and make the content easier to digest.
- Maintain good spacing: Proper use of white space prevents the brochure from looking cluttered and helps the reader focus on the key information.
Visual elements create an emotional connection and make the brochure more engaging.
3. Concise and Focused Content
The written content should be:
- Concise: Use short paragraphs, bullet points, and subheadings to make the text easy to read.
- Focused: Keep the information relevant to the brochure’s purpose. Avoid adding unnecessary details that could confuse or overwhelm the reader.
- Benefit-oriented: Instead of just listing features, highlight how the product or service benefits the reader. Use persuasive language to emphasize the value proposition.
Every word should serve a purpose, guiding the reader towards taking the desired action.
4. Clear Call-to-Action (CTA)
A successful brochure must have a clear call-to-action to prompt the reader to take the next step:
- Place CTAs strategically: The CTA should be prominent and placed at the end of each section or on the last panel of the brochure.
- Use action-oriented words: Use words like “Call Now,” “Visit Our Website,” “Book a Consultation,” or “Get a Free Quote.”
- Create a sense of urgency: Encourage quick action by adding phrases like “Limited Time Offer,” “Act Now,” or “While Supplies Last.”
CTAs guide the reader on what to do next and help achieve the brochure’s marketing objective.
5. Contact Information
Readers should be able to easily find your contact details:
- Include key contact information: Provide phone numbers, email addresses, physical addresses, website URLs, and social media links.
- Ensure accuracy: Double-check all contact information to ensure it’s accurate and up-to-date.
- Make it easy to find: Place the contact information in a visible section, such as the back panel or at the bottom of each page.
The goal is to make it easy for potential customers to reach you after reading the brochure.
6. Consistent Branding
The brochure should reflect your brand identity:
- Use brand colors and fonts: Stick to your brand’s official colors, fonts, and style guidelines.
- Include the company logo: Your logo should be placed in a visible area, such as the cover or top corner of each page.
- Maintain a consistent tone of voice: Whether it’s formal, casual, or playful, the tone of the brochure should align with your brand’s overall communication style.
Consistent branding ensures that the brochure aligns with other marketing materials, creating a cohesive brand experience.
7. Engaging Layout and Structure
The layout should be easy to navigate:
- Use sections and subheadings: Organize the content into sections with clear subheadings, making it easy for readers to find the information they’re looking for.
- Consider the brochure type: The layout will vary depending on whether it’s a bi-fold, tri-fold, z-fold, or digital brochure. Ensure the structure supports the content flow.
- Balance text and images: Ensure that there’s a good balance between text and visuals, making the content easy to skim.
An engaging layout improves the readability and overall effectiveness of the brochure.
8. High-Quality Paper and Print
If it’s a physical brochure, the quality of paper and print matters:
- Use high-quality paper: Heavier and glossy paper types give a more professional look, making the brochure feel premium.
- Choose the right size and fold: Standard sizes like A4 and A5 are common, but depending on the amount of content, you may opt for other sizes and folds.
- Opt for professional printing: Ensure the print quality is high, with clear images and vibrant colors.
A high-quality printed brochure enhances the perception of your brand.
9. Compelling Cover Design
The cover design sets the tone for the entire brochure:
- Include an eye-catching image: Use a striking image that represents your message or product.
- Make the headline prominent: The headline should be bold and positioned at the top, making it the first thing readers notice.
- Keep it simple: Avoid overcrowding the cover with too much text or imagery. It should be clean, focused, and compelling.
The cover determines whether the reader picks up the brochure, making it a critical element.
10. Purposeful Use of White Space
White space, also known as negative space, is an essential design element:
- Improves readability: It separates text blocks, making the content easier to read.
- Highlights important information: By surrounding key elements with white space, you draw attention to them.
- Enhances the design: It makes the brochure look less cluttered, giving it a clean and modern appearance.
Step By Step Tutorial on: How to Make Brochure in Canva?
A brochure is an essential marketing tool used to introduce a company, product, or service to potential customers. It’s a tangible piece of content that represents your brand, so making it effective is crucial. A successful brochure not only conveys the right information but also engages readers, persuades them to take action, and leaves a lasting impression.
Step 1: Sign Up or Log In to Canva
- Visit the Canva website: Open your web browser and go to Canva. You can also use the Canva mobile app if you prefer designing on a mobile device.
- Create an account: If you’re new to Canva, sign up using your email, Google, or Facebook account. If you’re already registered, simply log in.
- Choose the appropriate plan: Canva offers a free version, which includes numerous templates and design features. However, if you require additional features like more design elements, premium images, and brand kits, consider subscribing to Canva Pro or Canva for Enterprise.
Step 2: Choose the Brochure Template
- On the Canva homepage, click on “Create a design.”
- In the search bar, type “Brochure” to find the available templates.
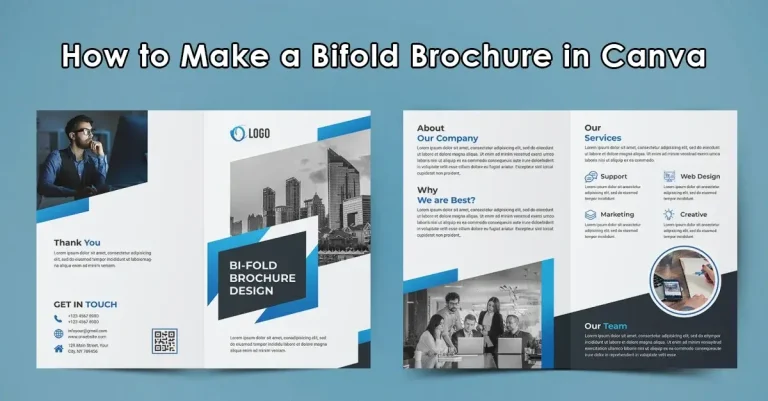
- Browse through the templates: Canva offers several types of brochures, including bi-fold, tri-fold, z-fold, and digital brochures.
- Bi-fold Brochure: Has four panels (two on each side) and is typically used for more concise information.
- Tri-fold Brochure: Has six panels (three on each side), making it perfect for organizing a lot of information.
- Z-fold Brochure: Has a zigzag layout, suitable for storytelling or step-by-step guides.
- Select a template that aligns with your purpose or branding. For example, you can choose templates based on themes like business, travel, food, or education.
Step 3: Customize the Brochure Layout
Once you’ve selected your template, Canva’s drag-and-drop editor will open. Here’s how you can personalize the design:
A. Editing the Text
- Replace the existing text: Click on any text box in the template to edit it. You can change the content to reflect your message, such as an introduction, services, pricing, or contact details.
- Adjust fonts: Use the toolbar at the top to change font style, size, and color. Canva provides a wide range of fonts, from formal and professional to modern and playful.
- Maintain hierarchy: Make sure to use larger fonts for headings, medium-sized fonts for subheadings, and smaller fonts for body text to ensure a clear information hierarchy.
B. Adding or Replacing Images
- To replace a template image, click on it, then delete it. Use the Uploads tab on the left to upload your own images from your computer.
- You can also choose from Canva’s library of free and premium images by clicking the “Photos” tab. Enter a keyword related to your brochure’s theme to find suitable images.
- Drag and drop the new image into the desired location. Use the resizing handles to adjust the size or position it correctly within the frame.
- Use grids or frames: Grids and frames help keep images aligned and sized appropriately. You can find them under the “Elements” tab.
C. Adjusting the Colors
- Click on any design element to change its color. Canva’s color picker will appear in the toolbar.
- Use your brand colors: If you have brand colors, click on the color square, then select “Add a new color” to input the HEX code of your brand colors. This will ensure consistency across all your marketing materials.
- For an appealing design, use a combination of 2-3 colors to maintain visual harmony. Avoid using too many colors, as it can make the design look cluttered.
D. Adding Design Elements
- Canva provides numerous design elements like shapes, icons, lines, stickers, and vectors. Use these elements to enhance your brochure’s design.
- To add elements, click on the “Elements” tab on the left side panel, search for the element you need, and drag it to the desired position.
- Shapes: Use them to create sections or emphasize important information.
- Icons: Use icons to represent features, services, or products. They can make your brochure more visually engaging.
- Lines and Dividers: Use lines to separate sections and create a more organized layout.
- Adjust the size, color, and position of these elements to fit your design.
Step 4: Organize the Layout for Better Readability
A brochure should be clear, informative, and easy to read. Here are some key tips to ensure a good layout:
- Use clear headlines and subheadings to break the content into manageable sections. This makes it easier for the reader to navigate the information.
- Leave sufficient white space around the text and images. White space helps prevent the design from looking crowded and improves readability.
- Arrange the information logically, guiding the reader from the most important points (such as an introductory message) to secondary information (like pricing or contact details).
Step 5: Review, Proofread, and Finalize
Before finalizing your brochure, make sure to proofread and review the design:
- Check for any spelling, grammar, or factual errors.
- Ensure images and text are aligned correctly and that the brochure flows smoothly.
- If you’re collaborating with a team, use Canva’s “Share” feature to allow others to review and edit the design.
Step 6: Download and Print Your Brochure
- Once your design is complete, click on the “Share” button on the top right of the Canva interface.
- Select “Download” and choose the file format. The recommended format for printing is PDF Print, as it retains high quality.
- Set the paper size: Make sure to select the correct paper size (A4, A5, etc.) depending on your printing needs.
- Click “Download” to save the file to your computer.
- If you want to share your brochure digitally, consider using PDF Standard or JPG format.
Step 7: Distribute Your Brochure
- Print your brochure at a local print shop or an online printing service.
- If it’s a digital brochure, you can share it via email, embed it on your website, or share it on social media.
Pro Tips for Designing an Effective Canva Brochure
- Keep the design simple yet impactful: Avoid overcrowding the brochure with too much information or design elements.
- Use high-quality images: Ensure all images are high-resolution to maintain professionalism and appeal.
- Maintain brand consistency: Incorporate your brand’s fonts, colors, and logo throughout the design to ensure uniformity.
- Prioritize key information: Use bold fonts, larger sizes, or different colors to highlight important messages like offers, contact information, or event dates.
By following these steps, you can create a well-designed brochure that communicates your message effectively, whether for print or digital distribution. Canva’s easy-to-use tools and extensive template library make it accessible to both beginners and experienced designers.